Easter Egg-Rubber Band Stripes

Easter Egg-Rubber Band Stripes

This simple rubber band technique works like a charm for fun and easy striped Easter eggs.

WHAT YOU NEED

1-2 dozen eggs
rubber bands (thick recommended)
Color Kitchen Easter Egg Coloring Kit
white vinegar

rubberband white

DIRECTIONS

Step 1: Hard boil 1-2 dozen eggs and chill.

Step 2: Mix up egg dyes (instructions on package).

Step 3. Make sure eggs are dry and then gently wrap around rubber bands. Make sure they are snug.

Step 4. Allow dyes to dry for several hours.

Step 5. Remove bands.


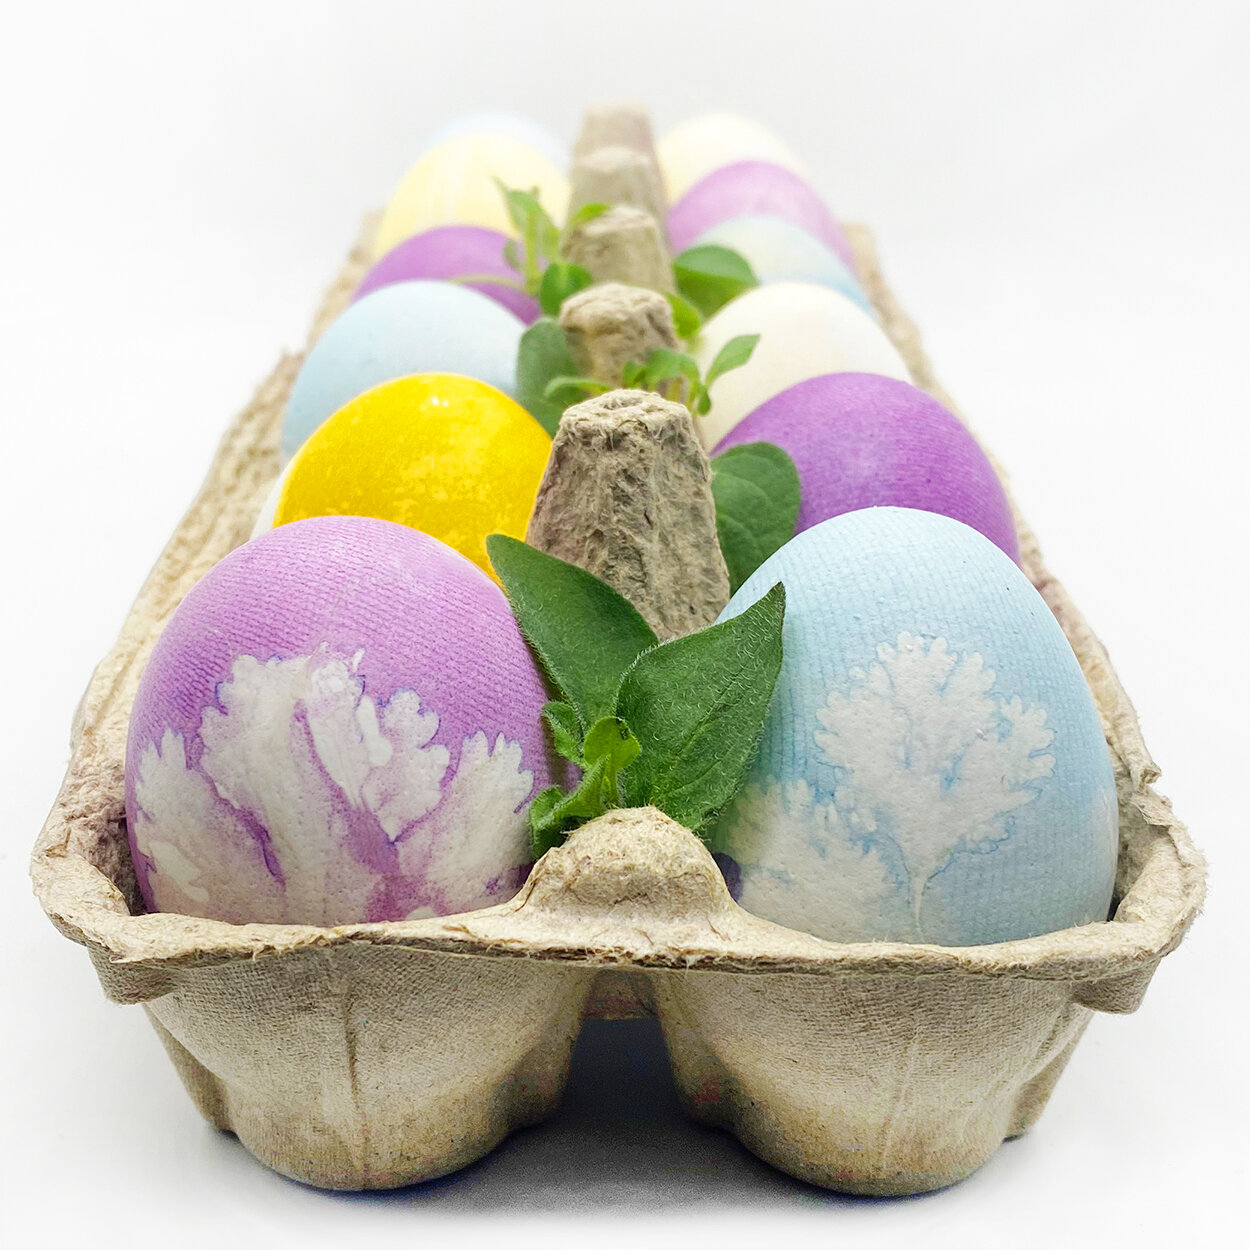
Leaf Print Easter Eggs-Natural Plant-based Dyes

Leaf Print Easter Eggs-Natural Plant-based Dyes

Have you always wanted to know how to color Easter eggs with leaf imprints? We take you step-by-step to show you how!

What you need

1-2 dozen eggs
nylon stockings
fresh herbs with soft leaves
Color Kitchen Easter Egg Coloring Kit
white vinegar

Herb egg

Directions

Step 1: Hard boil 1-2 dozen eggs and chill.

Step 2: Mix up egg dyes (instructions on package).

Step 3. Cut nylon into small bands, approximately 5 inches long. You’ll need as many as you have eggs.

Step 4: Make sure eggs are dry. Then place fresh leaf onto the egg and press lightly, so that the dye does not get underneath the leaves.

Step 5: Wrap gently but snugly in the nylon and tie closed with a knot or rubber band on both ends. The tighter you can get the better, but be careful not to crack the egg.

red egg

Step 6: Dip in color.

Step 7: Dab off excess water with a paper towel and leave to dry for several hours, or overnight.

Step 8. When dry, cut nylon open and gently peel off leaves.

Leaf Print Easter Eggs-Natural Plant-based Dyes


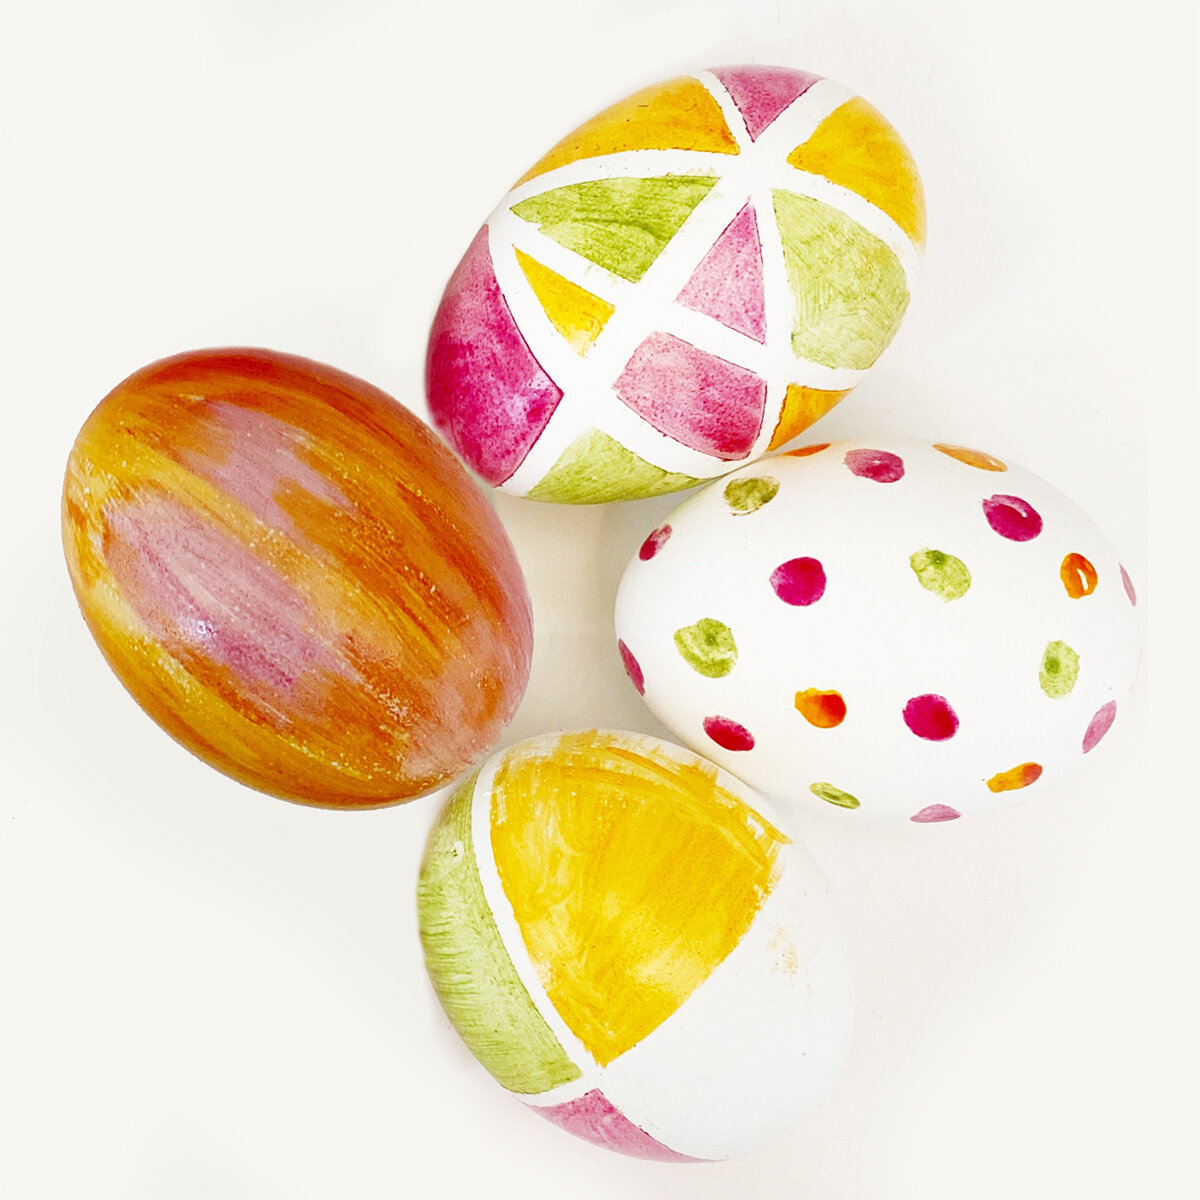
Geometric Easter Eggs with Colors from Nature

Painted eggs

Simple geometric patterns are back - and what better way to join in on the trend than with this year’s Easter eggs!

We’ll show you how to use our Easter Egg Paint Kit to create adorable mix and match Easter eggs with stripes, geometric patterns and of course polka dots!

Geometric Easter Eggs

What you need

1-2 dozen eggs
Color Kitchen Easter Egg Paint Kit
tape (recommended: blue painter’s tape)

Directions

Step 1: Hard boil eggs and chill.

Step 2: Make sure eggs are dry. Cut small strips of tape and begin taping off portions of the eggs in patterns with stripes, triangles and diamonds.

Leave a couple eggs plain for polka dots and other freehand patterns.

Step 3: Mix up egg paints*. Pour each color packet into a small cup or bowl. Add ¼ tsp water and blend with brush. Add another ½ tsp water and mix again into a paste. Make sure color is fully dissolved. For lighter pastels, add another tsp water and mix. *For more colors you may also use our regular food colors.

Step 4: Paint the white areas of the eggs using different colors. For freehand designs, paint on eggs like watercolors.

Step 5: Allow paint to fully dry (1-2 hours) and then carefully remove tape.

Geometric Easter Eggs

Tie Dye Easter Eggs with Natural Plant-Based Dyes

Tie Dye Easter Eggs with Natural Plant-Based Dyes

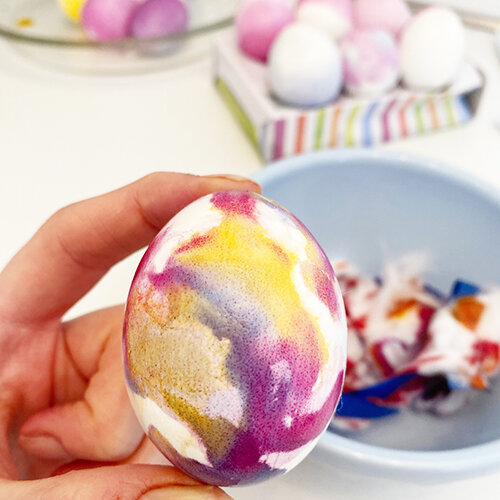
Easter eggs were MADE for tie dye-ing, but what’s the easiest way to do it? We’ll show you below!

Egg

What you need

1-2 dozen eggs
cotton balls
Color Kitchen Easter Egg Coloring Kit

directions

Step 1: Hard boil eggs and chill.

Step 2: Mix up dyes (instructions on package).

Step 3: Dip a cotton ball into one color and gently blot onto egg.

Step 4: Repeat this with each of your desired colors and overlap colors to blend.

Step 5: Allow eggs to dry for 1-2 hours.

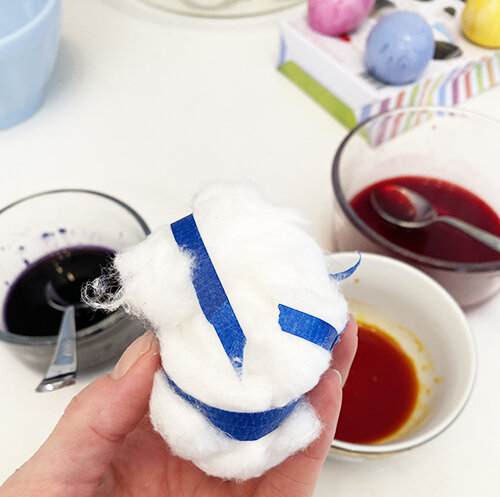
Two other ways you can achieve the tie dye effect are by dripping colors onto the egg and allowing them to blend, or by wrapping an egg in a cotton ball, taping the cotton onto the egg and dipping the egg in colors. Wait until fully dry (1-2 hours) before removing the cotton.

Tie Dye Easter Eggs with Natural Plant-Based Dyes

Rainbow Pancake Cereal | Gluten-free

Rainbow Pancake Cereal

It’s the latest breakfast craze, but with a pop of color!

MAKES: 60 MINI PANCAKES-ENOUGH FOR SEVERAL BOWLS OF CEREAL

Making Pancake Cereal is easy with Color Kitchen’s naturally vibrant food colors made from nutrient rich turmeric, spirulina and beet. You can use any pancake mix or our Color Kitchen Gluten-free Rainbow Pancake Mix with colors included.

INGREDIENTS

1 Color Kitchen Gluten-free Rainbow Pancake Mix
1 ½ cup milk (or substitute)
2 tbsp melted butter or oil
2 eggs (or egg substitute)

DIRECTIONS

Blend pancake mix with milk, butter and eggs. Split batter into 4 bowls, approx ¾ cup each. Add 1 color packet to each bowl and blend until all the color has dissolved.

ADDITIONAL COLOR MIXING
For purple mix equal parts pink and blue batter. For or orange mix 2 parts yellow to 1 part pink batter.

Put 1 tbsp colored batter per mini cake on the skillet and cook on low heat. Watch for browning and do not overcook.

Top with milk or maple syrup and enjoy a colorful and delicious breakfast treat!

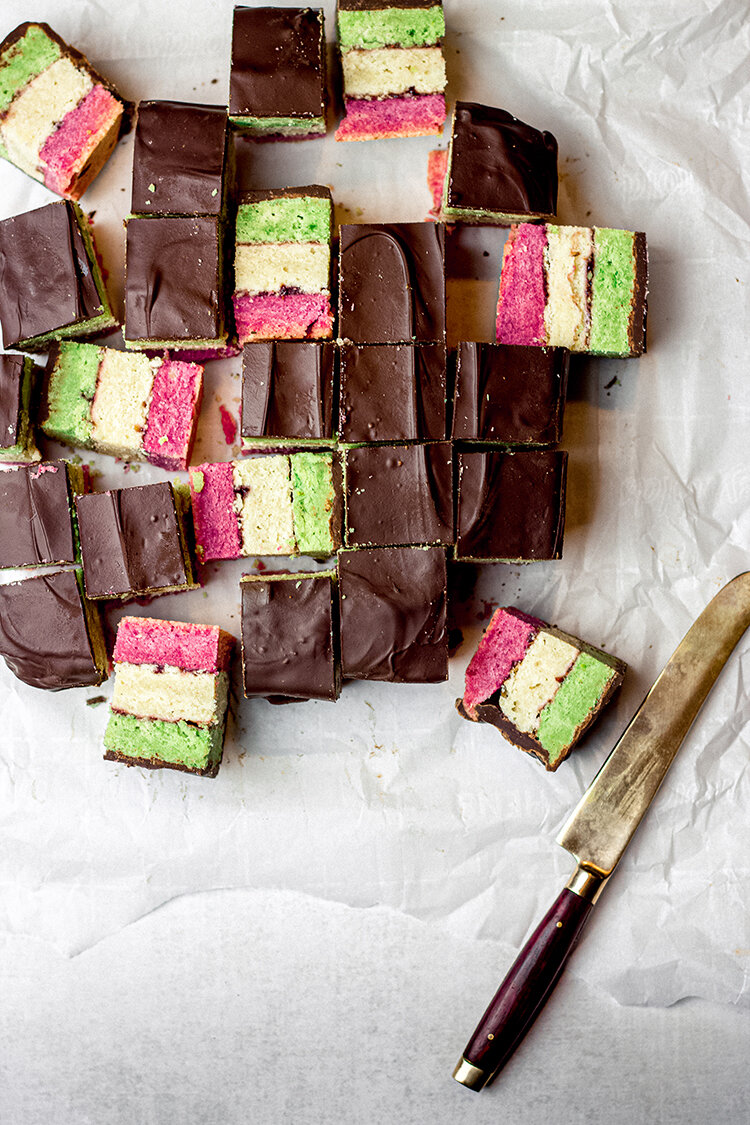
Italian Rainbow Cookies | Sugar-Free | Gluten-free

Italian Rainbow Cookies

A healthier, allergen-friendly take on the quintessential Italian dessert. Try with any color combination!

INGREDIENTS

ALMOND PASTE (makes approx. 8oz)
1 cup blanched almond flour
½ cup powdered monkfruit sugar
⅛ tsp salt
1 large egg white
½ tsp almond extract

COOKIES
8 oz almond paste
2 ½ sticks butter, cut into pieces + softened
2 cups gluten free 1:1 baking flour
1 cup granulated monkfruit
4 large eggs, room temperature, separate yolks from whites
½ tsp salt
2 tsp vanilla extract
1 tsp almond extract
1 Color Kitchen Pink Food Color packet
1 Color Kitchen Green Color packet

FILLLING
1 jar raspberry jam
10 oz chocolate

Italian Rainbow Cookies

DIRECTIONS

Prepare the Almond Paste: Using a food processor with the blade attachment, add almond flour, powdered sugar + salt and pulse until mixed.

Add in almond extract and egg white and continue pulsing until a dough forms.

Remove the dough from the food processor, roll into a log and wrap in plastic wrap, storing in the fridge until ready to use. The almond paste can be prepared ahead and refrigerated up to 10 days prior to using. This recipe makes approx. 8oz of almond paste; you will use all of it in the cookie batter.

Prepare the Gluten Free Italian Rainbow Cookies: Position oven racks on upper and lower thirds of the oven and preheat to 350F.

Grease and flour 8x8 baking pans or line with parchment paper.

In the bowl of a stand mixer fitted with the paddle attachment, combine almond paste and ¾ cups plus 2 tbsp of monkfruit sweetener. Mix on medium speed until small crumbles form.

Next begin adding softened butter a few pieces at a time, continuing to mix on medium speed until well combined. Next, beat in egg yolks, vanilla, and almond extract until smooth. The batter will be pretty thick which is normal.

In a separate mixing bowl, sift 2 cups of flour and ½ tsp of salt together. Gradually add to batter, mixing on low speed until combined.

In another bowl, beat egg whites until foamy. Using an electric mixer or the whisk attachment on your stand mixer is best rather than doing this by hand. Once egg whites are frothy, beat in additional 2 tbsp of granulated monkfruit + continue to whisk until stiff peaks form.

Gently fold in ⅓ of the egg whites into the batter using a silicone spatula, then gently fold in the remaining egg whites. The batter will feel a little difficult to work with but will become easier and fluffier as you add the egg whites. It will still be slightly dense once the egg whites are fully incorporated.

Next, evenly distribute the batter into 3 separate bowls. Mine weighed approximately 350g each, but you can eyeball this step if you do not have a kitchen scale.

Color the Batter: Add 1 packet of pink coloring to one bowl, 1 packet of green to another, and leave the third bowl plain. Using a silicone spatula or mixing spoon, fold in coloring packets until fully combined.

Bake the Layers: Transfer each of the batters to three separate parchment lined 8x8 baking pans. Dip an offset spatula in water and use it to spread the batter evenly around the pan, ensuring you get it into the corners of the pan. Smooth out the tops.

Bake for 8-10 minutes or until edges are golden brown. Note: if you are using glass pans, baking time will take slightly longer, closer to 12-15 minutes.

When finished, allow cakes to cool completely on wire racks.

Assemble the Layers: Once cool, place the green layer onto a cool cookie sheet or cutting board to use as a base. Gently spread a thin layer of jam on top. Carefully slide the plain layer atop the green and gently spread another thin layer of jam on top. Slide pink layer on top.

Carefully cover the cake with plastic wrap and place a second clean pan on top. Top the pan with heavy objects like cans or bags of flour to weigh down the layers. Refrigerate 4 hours up to overnight.

Add the Chocolate Layer: After cake has chilled, remove plastic wrap and carefully trim any uneven edges. Flip onto a cooling rack so the green layer is now on the top. Place the cooling rack atop a parchment lined cookie sheet to catch any mess.

Melt chocolate in a heat proof bowl resting above a pot of simmering water (this creates a double boiler). Carefully pour over cake. Dip an offset spatula into the simmering water and use it to evenly spread the chocolate over top of and alongside the cake.

Cut the Italian Rainbow Cookies: Using a sharp knife, cut the cookies into 25 pieces. If you want clean edges, dip your knife in hot water and clean with a towel in between cuts.

Store in an airtight container up to 1 week at room temperature.

~ A Pretty Delicious Life


Grinch Hot Cocoa | Natural | Dye-free

Grinch Hot Cocoa

Even the Grinch will start to like Christmas with this delicious drink!

MAKES: 4 CUPS

INGREDIENTS

4 cups organic milk
2 tbsp + 2 tsp (30 g.) organic sugar
2 tbsp (30 g.) organic white chocolate (for melting) chunks
1 Green Color Kitchen Color Packet
Whipped cream or marshmallows (optional)

DIRECTIONS

In a medium pot, add the milk, sugar, white chocolate and green dye.

Put over high heat and stir until temperature on a drink thermometer reaches 140-160 degrees.

Remove from heat and pour into mugs.

Top with marshmallows, whipped cream and sprinkles!

Candy Cane Mousse | Natural

Candy Cane Mousse

This unique and easy to make sweet treat will have your family and friends asking for more!

MAKES: 4 JARS

INGREDIENTS

1 ½ cups organic heavy whipping cream
16 g (1 tsp) organic sugar
1 tsp organic vanilla extract
250 g (1 ⅓ cup) organic white chocolate, chopped
1 tsp organic peppermint flavor
1 Pink and 1 Yellow Color Kitchen Color packets, or 2 tsp Color Kitchen Red Velvet Color
organic candy canes, crushed

EXTRAS

3 piping bags
decorating tip #846

Candy Cane Mousse Recipe by ColorKitchen

DIRECTIONS

In a double boiler, melt the white chocolate. Once completely melted, slowly add ¼ cup of the cream and stir to combine completely.

Remove from heat place in the fridge until completely cool, about 2 hours.

Divide the ganache into two separate bowls, they should weigh about 85 g each.

In one of the bowls, add the yellow dye, pink dye and peppermint flavor and stir to combine completely.

In a stand mixer fitted with whisk attachment (or you can use a hand mixer), add the remaining cream, sugar and vanilla extract. Whisk on low and gradually turn up the speed as soon as it doesn’t splatter anymore. Turn the speed up to high and whisk until the whipped cream has formed a stiff peak.

Divide the whipped cream into the two bowls of ganache, you will have about 57 g in each bowl. Fold in the whipped cream until completely combined.

Cover with plastic wrap and put back in the fridge for at least 4 hours or overnight.

Put both the white chocolate and pink peppermint mousse in a piping bag and cut a small hole in each.

Then place them both in another piping bag with decorating tip #846.

Pipe into shallow bowls or shot glasses and serve immediately.

Top with crushed candy canes.


Recipe by Dessert'D Organic Bake Shop

Candy Corn Ice Cream | Dairy-free | Paleo | Refined Sugar-free | Gluten-free

Candy Corn Ice Cream

Making your own ice cream is really not as complex as it may seem, and let’s be real, who doesn’t want this on hand in the freezer?

WHAT YOU NEED

Ice cream maker (optional but recommended!)
Saucepan
Whisk
A bread pan or airtight container

INGREDIENTS

2 cans of full fat coconut milk
1 tbsp of unsweetened gelatin powder
6-8 tbsp of honey
1 tbsp vanilla extract
Sprinkle of sea salt
1 Orange Color Kitchen Color packet
1 Yellow Color Kitchen Color packet

DIRECTIONS

If you are using an ice cream maker, make sure your ice cream bowl is frozen in advance.

Add cans of coconut milk to a saucepan and sprinkle the gelatin on top. Let sit for 3 minutes until a skin forms, and then whisk it into the milk.

Turn on your stove to medium heat and add in the honey, vanilla and sea salt. Start with 6 tbsp of honey and taste, if you want more honey flavor, or sweeter, add another tablespoon until your desired sweetness. The more honey you add, the more the ice cream will taste like candy corn! I recommend 8 tbsp (½ cup).

Heat your mixture until it reaches a low boil, then turn down and let simmer for 2 minutes.

Remove from heat and let cool until just room temperature. Then transfer into an airtight container and refrigerate until completely cold. Overnight is best. The mixture should firm up like a pudding/jiggly texture.

Once cold, transfer to your ice cream maker and churn for 20 minutes, or until ice cream is ready, per your machine. If you skip this step, your ice cream will not be as creamy but will still taste great. (You would just mix your cold mixture well until it’s smooth, skipping the churning).

When you have your honey-vanilla ice cream ready, divide it into three bowls evenly. Add one packet of orange to one bowl, and a one packet of yellow to the another bowl. Mix them in until you have a nice even color. You can add another packet of color if you want your colors to be more vibrant. Leave the last white bowl as is.

Now layer your ice cream in a small bread pan (or elongated airtight container) in three rows, starting with the white. Scoop the orange in the middle, and the fill the rest in with the yellow. So it looks like a candy corn! Optional to sprinkle real candy corns on top.

Place in freezer to set, about 45 minutes. Scoop and enjoy! It may take up to 30 minutes for your ice cream to be scoopable out of the freezer once fully set.

Recipe notes: 

-You don’t have to churn this ice cream but I highly recommend it. It makes it nice and creamy, and ice cream makers aren’t intimidating! If you decide to omit this step, just use your mixture out of the refrigerator, and mix really well before dividing into the bowls

-You can use less honey but this is what makes it taste like candy corn! I’d start with 6 tbsp and add more from there. If you want less sweet, start with 4 tbsp and add from there.

~Gutsy Baker, Stephanie Charbonneau


Halloween Cupcakes | Artificial Dye-free

Hallowwen Cupcakes

These sweet treats will WOW every party table! Get creative with your decorating and let the kids join the fun!

MAKES: 2 ½ CUPS FROSTING

INGREDIENTS

BUTTERCREAM
1 cup (2 sticks) unsalted butter at room temperature
1 lb confectioners’ sugar
Pinch salt
1 tsp pure vanilla extract
2 tbsp milk, at room temp

 COLOR
1 Orange Color Kitchen Color packet
1 Green Color Kitchen Color packet
1 tbsp Black cocoa

DECORATE
Cadbury’s chocolate fingers, or mini peanut butter cups
Mini chocolate chips
Piping tips: medium closed star tip (Ateco 845) , medium flat tip (Wilton 45), size 1 round tip
Candy eyeballs

Orange Cupcakes

DIRECTIONS

Start with your favorite cupcake recipe.

Make buttercream. Using an electric mixer or stand mixer (with paddle attachment), in a large bowl, beat butter, sugar, and salt on low speed until incorporated. Increase speed to medium and beat to dissolve the sugar, 2 minutes. Add vanilla and milk mix until just combined. The buttercream should be soft but firm enough to pipe.

To make black buttercream, place black cocoa in a small bowl and combine with water (about 2 tsp) to make a smooth paste. Mix with ½ cup buttercream and transfer to a piping bag fitted with a small round tip.

To make Frankenstein, spread cupcakes with green buttercream. Holding the cupcake at an angle, dip the top ⅓ of cupcake in a bowl of mini chocolate chips to coat. Fit a piping bag with a small round tip and fill with black buttercream to pipe eyes, nose, mouth and scars. Use small pieces of chocolate finger cookies or mini peanut buttercups and gently press into sides of face for the bolts.

Mummy Cupcake

To make pumpkins, fill a piping bag fitted with a medium closed star tip (such as Ateco 845) with orange buttercream. Pipe four curved lines the length of the cupcake, finishing in a point at one end. Place chocolate cookie or peanut butter cup for the pumpkin stem. Fit a piping bag with a small round tip and fill with green buttercream. Pipe pumpkin vines around the stem.

To make a mummy pumpkin, spread cupcakes with orange buttercream. Place a chocolate cookie or mini peanut butter cup for a stem. Fit a piping bag with a small round tip and fill with black buttercream to pipe triangular, nose and zig-zag mouth. Fit a new piping bag with a flat tip (Wilton 45) and fill with white buttercream. Pipe over the cupcake in a zigzag pattern, leaving gaps so you can see underneath. Place two candy eyeballs for the eyes on top. 

To make skeleton, spread cupcakes with white buttercream. Fit a piping bag with a small round tip and fill with black buttercream to pipe a mouth, heart-shaped nose, slanted eyes and eyebrows.

 ~Anna Helm Baxter


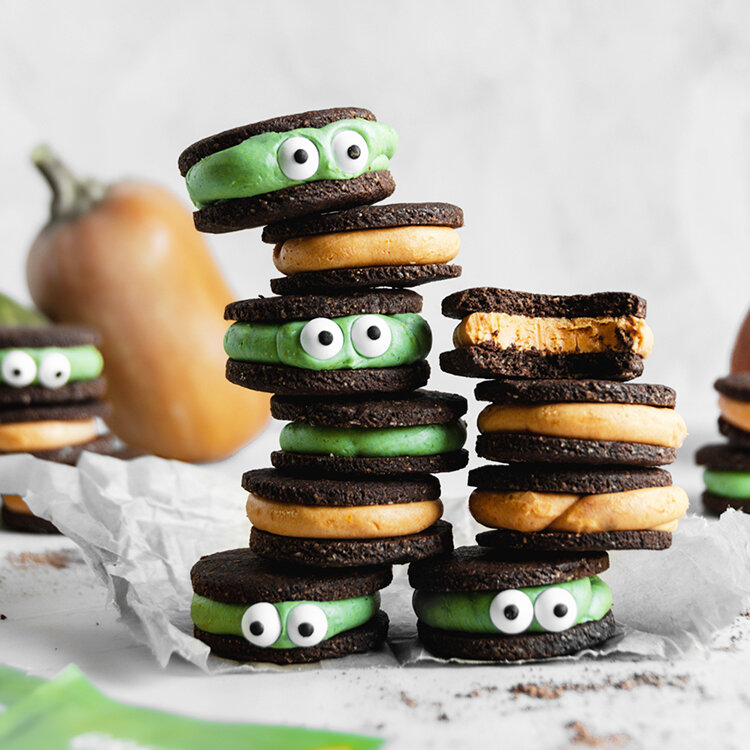
Halloween ‘Oreo’ Monster Sandwich Cookies | Dairy Free | Gluten-free | Low Glycemic | Vegan-friendly

Halloween ‘Oreo’ Monster Sandwich Cookies

It’s like the double stuffed holiday oreos, but like, a million times better…

MAKES: 20 COOKIES, 10 SANDWICHES

INGREDIENTS

COOKIE
½ cup oat flour
½ cup almond flour
½ cup cacao or unsweetened cocoa powder (the darker cocoa the better)
5 tbsp of coconut sugar
¾ tsp baking powder
⅛ tsp sea salt
¼ cup of melted coconut oil (plus 1 tbsp)
3 tsp of maple syrup
1 egg room temperature, or sub for flax egg 

FILLING
4 tbsp of plant-based butter or regular butter
1 cup powdered sugar (make unrefined powdered sugar by putting any granulated sweetener in the blender for 30 seconds)
¾ tsp vanilla extract
1 tbsp of non dairy milk
1 Orange Color Kitchen Color packet
1 Green Color Kitchen Color packet

DIRECTIONS

COOKIE 
Preheat the oven to 350ºF and line a baking sheet with parchment paper

Combine all ingredients together except for the coconut oil, maple syrup, and the egg

Now melt ¼ cup of coconut oil to warm, not hot, and add to the dry ingredients. Combine and then add in the maple syrup and room temperature egg until a dough forms. If the dough still crumbles and does not form a solid dough when rolled into a ball, add another tablespoon of coconut oil.

Refrigerate for 15 minutes until dough chills.

Now take out the dough, roll into a ball and place between two pieces of parchment or wax paper. Using a rolling pin, roll the dough out to about ⅛” thickness, or however thick you want your cookies. But ⅛” is true to an Oreo. If they’re thicker they may have to bake for an extra 1-2 minutes.

Using a 1 ¼” (or close to that size) circle cookie cutter, or top of a glass (get creative with what you can use)! Cut out small circles and place them on the lined baking sheet. Repeat this process with the extra dough until it is all used. Place the circles on your baking sheet. It should make 18-20 cookies.

Bake for 8-10 minutes. Let cool on the baking sheet for a few minutes so they do not break when you transfer them, and then move them to a cooling rack to cool completely. 

Orange Hallowwen Cookies

FILLING
Your cookies must be cool before you frost them! And you will need a hand mixer to make the frosting.

First, soften your butter in the microwave. You can do this by putting the microwave on defrost setting and placing the butter in there for 30 second increments until just soft.

Now mix this butter with a hand mixer until it gets soft and fluffy. Add in your powdered sugar and keep mixing until the clumps are mixed in.

Mix in your vanilla and milk for about 1-2 minutes until it becomes a frosting consistency.

Divide your frosting in half in two bowls. Add one packet of Color Kitchen Foods Orange color powder to one of the frosting bowls and mix thoroughly until combined. Now do the same with the Green color powder.

MAKE THE COOKIES
I used a piping bag to squeeze the icing on the cookies, it gives them a smooth edge. But you can frost them on as well. I did about 2 tsp of frosting per cookie. Spread it out evenly and then smoosh the cookie down a bit with the top half of the other cookie.

Place in the fridge for 30 minutes or freezer for about 15 minutes, to set. Store in the refrigerator or freezer, the icing may get soft at room temperature.

Enjoy!

~Gutsy Baker, Stephanie Charbonneau

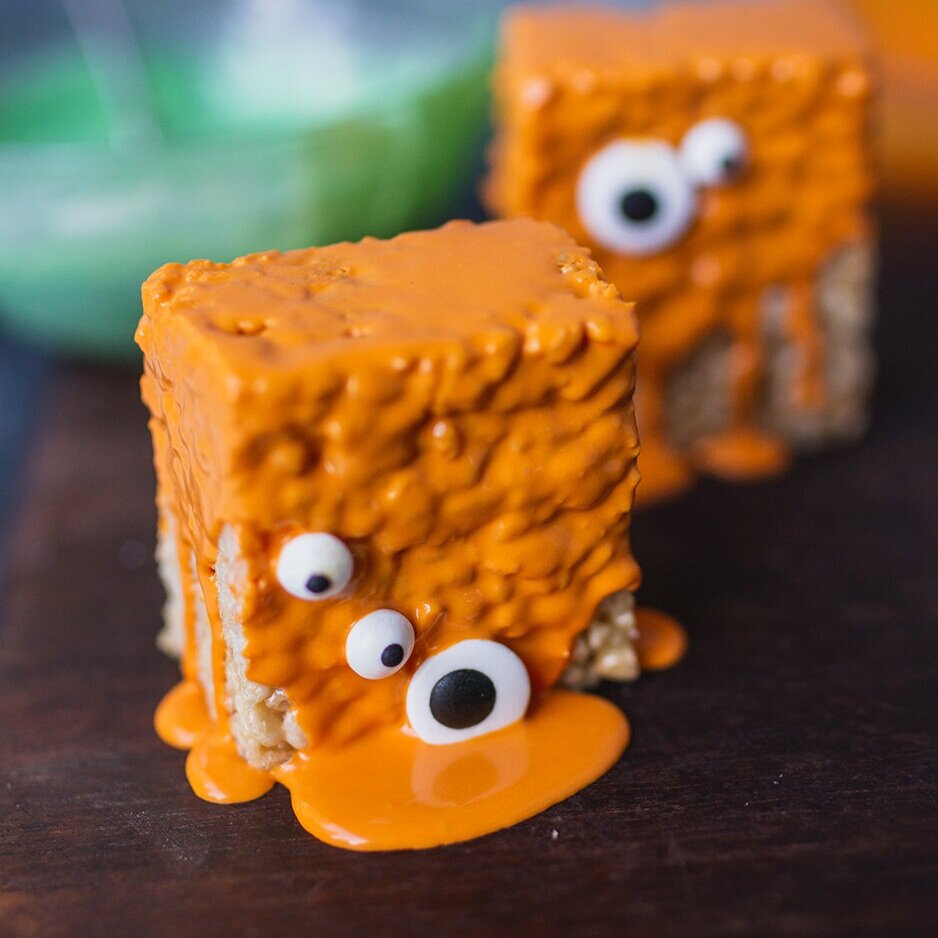
Halloween Rice Crispy Treats with Simple Ingredients | Natural | Dye-free

Orange Rice Crispie Treats

A classic crowd pleaser that is truly a quick and easy bake!

INGREDIENTS

RICE CRISPY TREATS
¾ cup butter
2, 10 ounce bags of mini marshmallows (11 cups)
½ tsp vanilla extract
9 cups rice crispy cereal

GLAZE
2 ¼ cups powdered sugar
whole milk
vanilla extract
1 Orange Color Kitchen Color packet
1 Green Color Kitchen Color packet
1 Blue Color Kitchen Color packet (to make purple)
1 Pink Color Kitchen Color packet (to make purple)


DIRECTIONS

CRISPY TREATS

Thoroughly grease a 9×13 inch baking pan.

In a large non-stick pot, melt butter over low-medium heat. Add marshmallows and stir until melted.

Remove from heat and mix in vanilla.

Add rice cripsy cereal, stir and coat but do not over mix.

Grease spatula and spread mixture into pan evenly.

Let cool completely for a couple hours. When cooled make glaze.

Halloween Rice Crispite Treats

NATURALLY COLORFUL GLAZE

Divide powdered sugar into 3 medium sized bowls, approximately ¾ cup each. Mix powdered sugar with a spoon and break apart any clumps in the sugar.

Add Orange to one bowl, Green to second bowl, and Blue and Pink to third to make Purple.

Add 2 ½ tsp milk and ¼ tsp vanilla to each bowl and blend with a spoon. If too thick add ½ tsp more milk at a time until lightly runny. Stir until all the sugar and color is dissolved.

DECORATE

Using spatula, remove crispy treats from pan and place on a cutting board. Cut into even sized squares.

Cover baking tray with parchment paper.

Dip squares into glaze bowls and then turn over on clean side to dry, letting the icing drip down the sides.

Decorate with eyes or other Halloween spooky goodies.

Let glaze dry for several hours.

Hocus Pocus Spellbook Brownies | Grain Free | Low FODMAP Friendly

Hocus Pocus Spellbook Brownies

MAKES - 9 brownies

INGREDIENTS

BROWNIES
6 tbsp tapioca flour
4 tbsp unsweetened cocoa or cacao powder
12 oz dark chocolate, coarsely chopped
6 tbsp coconut oil
4 large eggs
⅔ cup granulated monk fruit sweetener 
½ cup coconut sugar
1 tsp kosher salt
2 tsp vanilla extract

FROSTING
⅓ cup butter or vegan butter
3 cups Paleo powdered sugar**
1 ½ tsp vanilla extract
1-2 tbsp plant based milk
1 Orange Color Kitchen Color packet
½ Pink Color Kitchen Color packet + ½ Blue Color Kitchen Color packet

**You can use confectioner’s sugar or DIY your own Paleo sugar if on a reduced sugar diet. Simply add 3 cups of granulated sweetener of choice (I use monk fruit) to a blender and pulse for 30-40 seconds)

ADDITIONAL DECORATIONS
Edible candy eyes
Color Kitchen Rainbow Sprinkles

EQUIPMENT NEEDED
8x8 Brownie Pan
Cooling Rack
Electric or Stand Mixer preferable
2 clear piping bags
Small round + small star piping tips

DIRECTIONS

BROWNIES
Pre-heat oven to 350°. Line an 8×8″ baking dish with parchment paper (easiest if you use 2 pieces of parchment that overlap and leave a 3” overhang on the sides)

Whisk tapioca flour and cocoa powder in a medium bowl until no lumps remain. 

Heat chocolate and coconut oil in a small saucepan over low, stirring, until melted and smooth. DO NOT bring to a boil!

Using an electric mixer on medium-high speed, beat eggs, granulated monk fruit, and coconut sugar in a large bowl until light + smooth, about 3–4 minutes. 

Beat in salt and vanilla to combine, then beat in chocolate mixture, scraping down sides as needed, until incorporated. 

Beat in tapioca flour mixture, then increase speed to medium-high and beat until mixture is thick and holds its shape, about 30 seconds.

Pour into parchment lined baking pan + bake until a cake tester or toothpick comes out clean, approximately 20-25 minutes.

FROSTING
Prepare the frosting while the brownies bake.

In a medium bowl, beat butter, powdered sugar and vanilla on medium until fully incorporated. Add milk 1 tbsp at a time until frosting texture is thick + creamy. You do not want to add too much milk as your frosting will be soupy.

Divide frosting into two bowls. Using separate spoons, fold in coloring packets, mixing to fully combine.

Grab your piping bags and make a snip on each end about ¼” up from the bottom. Insert the small round tip in one bag and the small star tip in the other.

Hocus Pocus Spellbook Brownies

Add orange frosting to the piping bag with the small round tip by spooning it into the bag and gently squeezing until frosting is able to make its way through the tip.

Repeat for the purple frosting.

Once brownies have finished baking, allow them to fully cool before decorating. Place on a cooling rack in the fridge for 20-30 minutes to speed up the process.

When brownies are fully cooled, slice into 9 squares and prepare to decorate!

DECORATE
Take one candy eye and pipe a small dollop of orange frosting on the back. Press candy eye onto brownie. It’s ok if you push down a bit to help it stay secure. If you have tweezers, they will be helpful for this step but they are not necessary.

Next, take your orange piping bag + pipe out two loops, almost like a pretzel shape, on the top and bottom right hand corners.

Along the left side, pipe two parallel lines of orange, then a squiggle down the middle. This doesn’t have to look perfect, make sure you’re having fun!

Then, take your purple piping bag and pipe a circle around the eye. 

Add two dots of purple frosting to the center of each “pretzel” shape + a few more dots around the surface of the “book”. To make this simpler, but gentle pressure on the piping bag, press down lightly into the brownie, and pull straight up.

Lastly, just for fun, add some sprinkles to the “spine” of the book and voila! You have made Hocus Pocus Spellbook Brownies!


~Kimberly Cauti @prettydeliciouslife


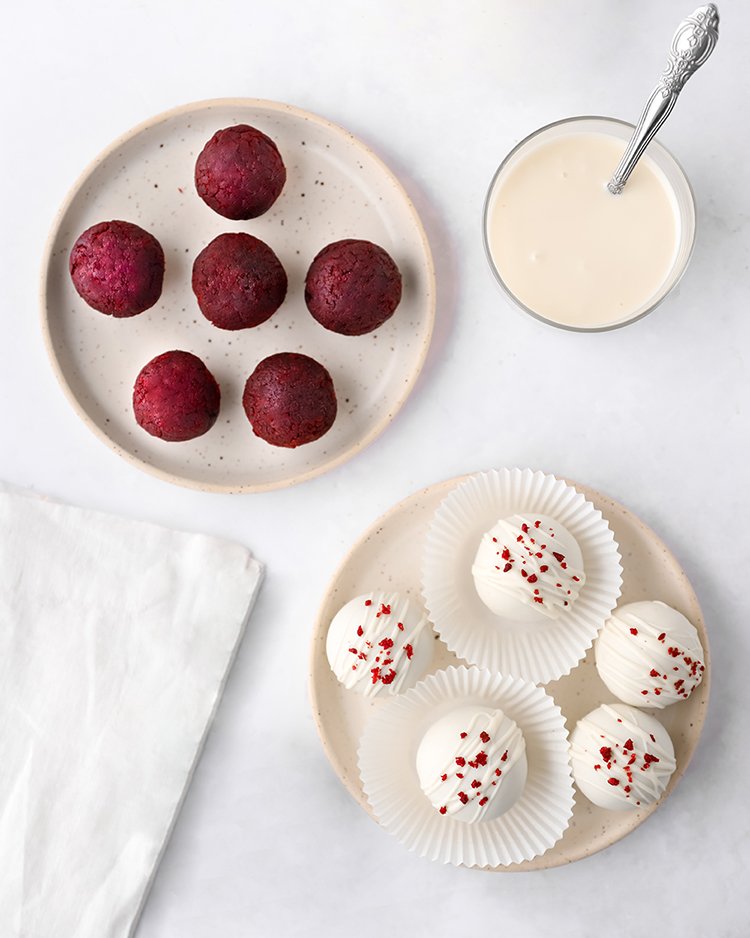
red velvet cake truffles | gluten-free | natural

red velvet cake truffles

These poppable, delectable Love Day treats are the perfect dessert after a romantic meal.

MAKES: 16-20 CAKE TRUFFLES
Prep Time: 40 minutes
Cook Time: 30 minutes

Ingredients

INGREDIENTS
½ cup butter (room temp)
1 ½ cup organic sugar
2 eggs
1 tsp vanilla
2 Tbsp cocoa powder
2-3 Tbsp ColorKitchen Red Velvet color (11-13 grams)
1 tsp salt
1 tsp baking powder
2 ½ cups flour
1 cup buttermilk
1 Tbsp vinegar
12 oz white chocolate candy melts
16-20 straws or lollipop sticks
1 styrofoam board

red velvet cake truffles

Directions

Heat oven to 350 degrees. Butter two 9-inch cake pans and lightly dust with cocoa powder.

Mix butter, sugar, eggs and vanilla.

In a separate bowl mix dry ingredients: flour, red velvet powder color, cocoa powder, baking powder and salt.

Add vinegar to buttermilk.

Slowly add dry blend into butter mixture along with buttermilk/vinegar.

Divide batter evenly between the two pans. Place pans on the middle rack of the oven. Bake for 25-30 minutes, until a toothpick inserted in the center comes out clean. Cool for 10 minutes

Empty the cake pans into a large bowl.  Use a fork or your hands to break up the cake and mash it into a dough.  Form the dough into 16-20 smooth 2 tablespoon- sized balls.  Place the balls in the fridge for 10 minutes

Place the white chocolate melts in a microwave-safe cup or bowl.  Microwave in 30-second increments, mixing after each increment, until completely melted.

Insert a straw or lollipop stick into one of the cake balls.  Dip the ball into the melted white chocolate to coat.  Push the cake pop stick into a styrofoam block to dry in an upright position.

Repeat with all of the cake balls.  Allow the balls to dry for at least 1 hour.  

Rainbow Heart Petal Cake | Natural | Dye-free

Rainbow Heart Petal Cake

Love is Love…is LOVE! Decorate any of your favorite cakes with this skill that is simple to master.

Rainbow Frosting

DIRECTIONS

Have prepared a fully frosted layered cake of at least 5-6 inches tall.

Prepare 6 small bowls for making “gel” colors (red, orange, yellow, green, blue, purple), by mixing 1 ¼ tsp of each color powder with ¼ tsp of water. Stir with a small spoon or brush until all the color is dissolved. For purple, mix 2 tsp of pink color and 2 tsp of blue color (If using packets, each packet is 2.5g - 1 ½ tsp).

Stir in a ½ pint of white vanilla frosting and allow color to develop for 10 minutes. Mix and add more color for a deeper saturation of color.

Prepare 3 baking trays with parchment paper.

Fit 6 pastry bags with a coupler tip and use a #32 piping tip.

Pipe many small 1 inch hearts left half then right half in each color. A 5-inch cakes needs at least 13 hearts for each color.

Rainbow Petals

Freeze trays of hearts until frosting is fully firmed.

Starting from the bottom of the cake, pipe a small dollop of frosting to where the heart will be placed. Starting with purple, gently press a heart upon the cake. Alternate the following hearts upside down then rightside up.

Change colors with each row completed, beginning with purple, blue, green, yellow, orange, and red.

-Heather Wong - Pastry Chef, Flouring LA 

Inspired by Qookie The Cakery

Get Colors for the Rainbow Heart Petal Cake

Colorful Ice Cream | Paleo | Dairy Free

Crazy Vanilla Ice Cream

Here’s a healthy version of an old 90s ice cream favorite Crazy Vanilla, by the Gusty Baker. This paleo, dairy free and fodmap friendly recipe also has gelatin which is great for gut healing!

INGREDIENTS

2 cans of coconut milk or coconut cream
4 tsp of vanilla extract
1 ½ tbsp of unsweetened gelatin (1 ½ packets)
½ cup of honey, or maple syrup for low-fo
pinch of sea salt
Color Kitchen Color packets

DIRECTIONS

Pour the coconut milk in a saucepan and sprinkle gelatin on top, let it bloom for a few minutes (it will create a skin on top), then whisk in and turn on heat. Add in rest of the ingredients EXCEPT food colorings and whisk until a low boil. Take off stove. Once cooled, put in fridge until completely cold.

Put batch in ice cream maker (Cuisinart recommended) for 15-20 minutes. If you decide to skip the churning and just freeze the mixture it will work, but it won't be as creamy or soft once frozen.

Now separate the vanilla ice cream mixture into 3 equal parts, in separate bowls. Add 2 tsp+ of natural color powders to each bowl. You can adjust color to your liking. Fold around with a spatula until fully mixed in. It’s ok if the ice cream gets a little melty while you're mixing.

Then use a small loaf pan, cake pan or container of choice (make sure the ice cream will be deep enough to cover bottom and scoop) and add spoonfuls of each mixture into the pan, alternating colors. Recommended: use 3 different spoons so the colors don’t mix. Then finally take a knife and do a light swirl through the mix. Freeze until set. It’ll take about 20 minutes to thaw out to be scoopable once frozen.

~Gutsy Baker, Stephanie Charbonneau
.

Pumpkin Spice Marshmallows | Keto | Paleo | Low Carb | Dairy-free | Gluten-free

Pumpkin Spice Marshmallows

Soft and pillowy, great to pop in your coffee, hot cacao or just eat plain for a sweet snack or treat. Cut them into big or small pieces. The size of your pan will determine the size of your marshmallows.

For more detail recipe and nutrition notes, visit Krysten’s Kitchen.

INGREDIENTS

1 pouch NuNaturals Pumpkin Spice Syrup
½ cup water
3 tbsp Vital Protiens Gelatin
1 ½ tbsp arrowroot starch, divided
1 Orange Color Kitchen Color packet
For photos of each step see ~Marshmallow Recipe~

DIRECTIONS

In a large mixing bowl, add gelatin and water, stir and allow to sit while you prepare the syrup.

Prepare a small glass dish or 8 by 8 pan with parchment paper. Lightly spray it with olive oil or coconut oil spray and about ½ tbsp arrowroot starch.

Have a hand mixer or stand mixer READY TO GO the moment it’s needed. You can't waste any time in between steps.

In a medium size sauce pan, add the whole pouch of NuNaturals Pumpkin Spice Syrup and turn on medium heat. Allow it to reach boiling point and bubble for about 20-30 seconds and then turn off heat. This could take up to 2-3 minutes.

Pour the hot syrup slowly into the large mixing bowl of gelatin and water (which will have hardened — that’s okay!). As soon as syrup is poured in, turn hand mixer on and mix at a low speed for about 20 seconds to break up the hardened gelatin.

Crank the mixer up to HIGH speed and mix for about 6-7 minutes. After about a minute of mixing, pour in a packet of Orange Color Kitchen Color packet. It will turn white after a few minutes of mixing and thicken quickly so watch it. Depending on how fast your mixer is, the time could vary.

Once the outside of your mixing bowl has mostly cooled and your mixture is thick & glossy, pour it into the prepared baking dish. It should POUR or fall with grace. If you have over mixed it then it will harden pretty fast.

DON’T WORRY — it’s not too late to fix your marshmallows if they have hardened too fast. If you’re using a glass mixing bowl, pop it in the microwave (something I don’t normally use or recommend ever) and cook it for about 10 seconds. This should loosen it up enough to pour into your baking dish.

Sprinkle about ½ tbsp arrowroot starch on top (optional).

Allow marshmallows to sit for at least 35-40 minutes at room temperature.

Remove marshmallows from the dish by lifting the parchment. Place on a cutting board and using a sharp knife, cut into desired shapes and sizes. Toss them in a bowl with remaining ½tbsp arrowroot starch so that each side is coated. This will prevent them from sticking.

Store in a mason jar in a dark, cool place for up to 7 days.

~ Krysten’s Kitchen

Colorful Tie Dye Cupcake | Dye-free | Natural

Colorful Tie Dye Cupcake
Cupcakes

These Tie Dye cupcakes are swirling with color inside and out, made with only natural plant-based colors and ingredients!

MAKES 12-16 CUPCAKES

INGREDIENTS

CUPCAKES
1 cake/cupcake mix
2 Yellow Color Kitchen Color packets
2 Pink Color Kitchen Color packets
2 Blue Color Kitchen Color packets

Tie Dye Cupcakes

FROSTING
1 Color Kitchen Plain Frosting Mix
1 Yellow Color Kitchen Color packet
1 Pink Color Kitchen Color packet
1 Blue Color Kitchen Color packet
1 Green Color Kitchen Color packet (optional)

DIRECTIONS

CUPCAKES
Preheat oven to 350 degrees. Prepare cupcake tins with liners.

Mix cupcake batter and split into 3 bowls. Add 2 color packets per bowl and blend until all the color is fully dissolved.

Put 1 tbsp each colored batter into each cupcake tin. Swirl with a spoon once.

Put in oven and bake for 20 minutes or until a cake tester inserted into the center of the cupcakes comes out clean.

Cool cupcakes before frosting.

FROSTING
Make frosting according to directions.

Add approx 1 color packet per ⅓ cup frosting.

Combine 3 frosting colors into a piping bag with star tip. Try to keep colors separated. Squeeze out a little bit of frosting until combined color swirl shows, then frost cupcakes.

Here are some suggested ratios per ⅓ cup frosting for saturated colors:

Purple: 1 tsp pink + 1 tsp blue
Green: 1 tsp blue + 1 tsp yellow (or 1 ½ tsp green)
Pink: 1 tsp pink
Blue: 1 tsp blue


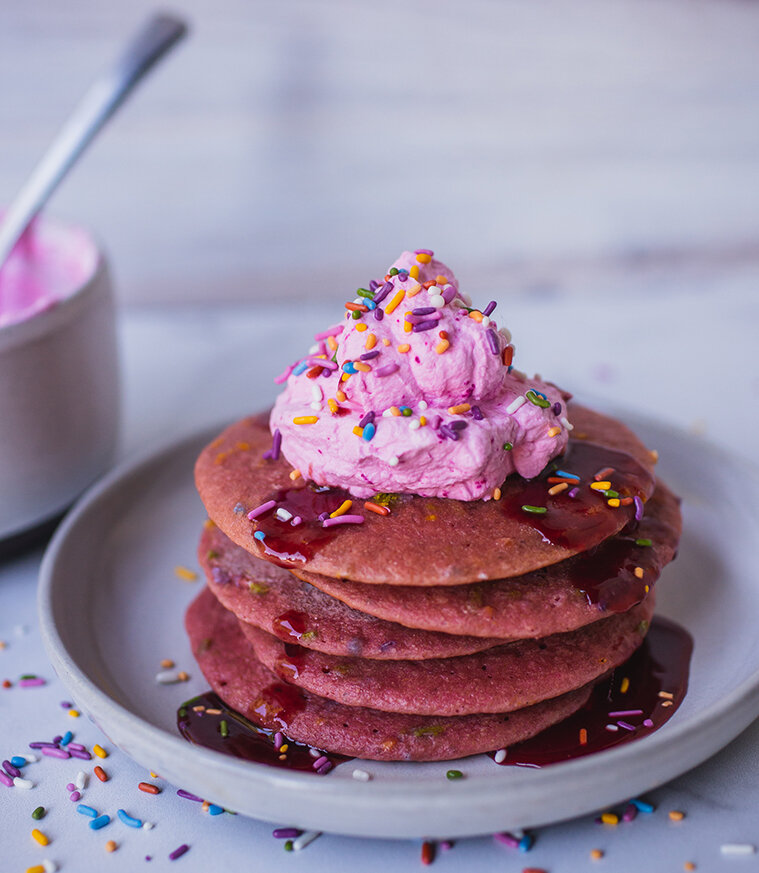
Pink Pancakes | Naturally Colorful

Pink Pancakes

Add a little color to your morning cakes. Perfect for Valentine’s Day, Mother’s Day, or any day.

INGREDIENTS

PANCAKES
any pancake mix or recipe from scratch
1 Pink Color Kitchen Color packet
1 Color Kitchen Rainbow Sprinkles packet
raspberry syrup

WHIPPED CREAM
⅓ cup powdered sugar
1 Pink Color Kitchen Color packet
1 ¼ cup heavy cream
1 tsp vanilla

DIRECTIONS

WHIPPED CREAM
Chill a medium-sized bowl in the freezer for at least 10 minutes.

Blend dry ingredients: powdered sugar and color.

Add heavy cream and vanilla extract.

Beat with an electric mixer on high speed until stiff peaks form. Keep in refrigerator until pancakes are ready.

PANCAKES
Mix pink color with dry pancake mix. Add wet ingredients and blend fully until all the color is dissolved. Add ½ sprinkle packet to batter and mix lightly. Do not let sit for long after adding sprinkles. Save ½ sprinkles for topping.

Use low heat on pancakes. Let cool slightly and top with whipped cream, syrup and sprinkles!

Colorful Cereal Milk Bowl | Natural

Colorful Cereal Milk Bowl

A simple way to brighten your day. Just add a little color to your cereal milk. No need for sugar or artificial ingredients to have your cereal pop with color!

INGREDIENTS

cereal
milk
1-3 Color Kitchen Color packets (pink + blue + yellow shown here)
1 Color Kitchen Rainbow Sprinkles packet (optional)

DIRECTIONS

Mix ½ tsp color with ½ tsp milk in the bottom of your bowl to dissolve color. Add a little of the pink color to blue for purple.

Add milk and stir.

Add cereal and top with sprinkles (optional). Enjoy!